One of the frequent challenges of photographing static aircraft on the ground is to get them to stand out clearly from the background. This applies especially to camouflaged planes (duh!), but busy backgrounds can be just as bad at taking the viewer’s eyes away from the subject.
To get some separation of the subject, the obvious approach is to use a fast lens wide open with a narrow depth of field, so the plane stands out against the out-of-focus background.
That’s fine if you have a Noctilux – but I don’t! So, I’ve started using an old trick, sometimes known as a bokeh pano – or the Brenzier effect, after the person who popularised the method.
The basic idea is very simple. A lens with a longer focal length will generally give a shallower depth of field at any given aperture than a shorter lens. This means that several images stitched together from a long lens can give the effect of a wider lens, and with shallow depth of field. So, for those of us whose budgets don’t stretch to f/0.95 (if only …) this is a simple way of achieving a similar effect.
The opening shot (Fig. 1) is from an early morning shoot at Stow Maries a couple of weeks ago. Stow Maries is the only preserved First World War airfield, one of the original RFC bases.
I was lucky enough to get on a dawn shoot there – which ended up going on well into the morning. The aircraft is a BE2, based, for the moment, at Stow Maries. The guy on the left is a re-enactor, dressed in RFC uniform, inspecting the plane before setting off on a patrol. (The boots are sheepskin lined – they look fab – just the thing to stop frozen extremities at 10,000 ft in an open cockpit).
I wanted to get the plane to stand out against the background: a bokeh pano was the obvious answer. There’s a big BUT though – and that was the re-enactor moving around. How do you stitch something with a person moving rapidly around the plane meaning that he appears in multiple frames?
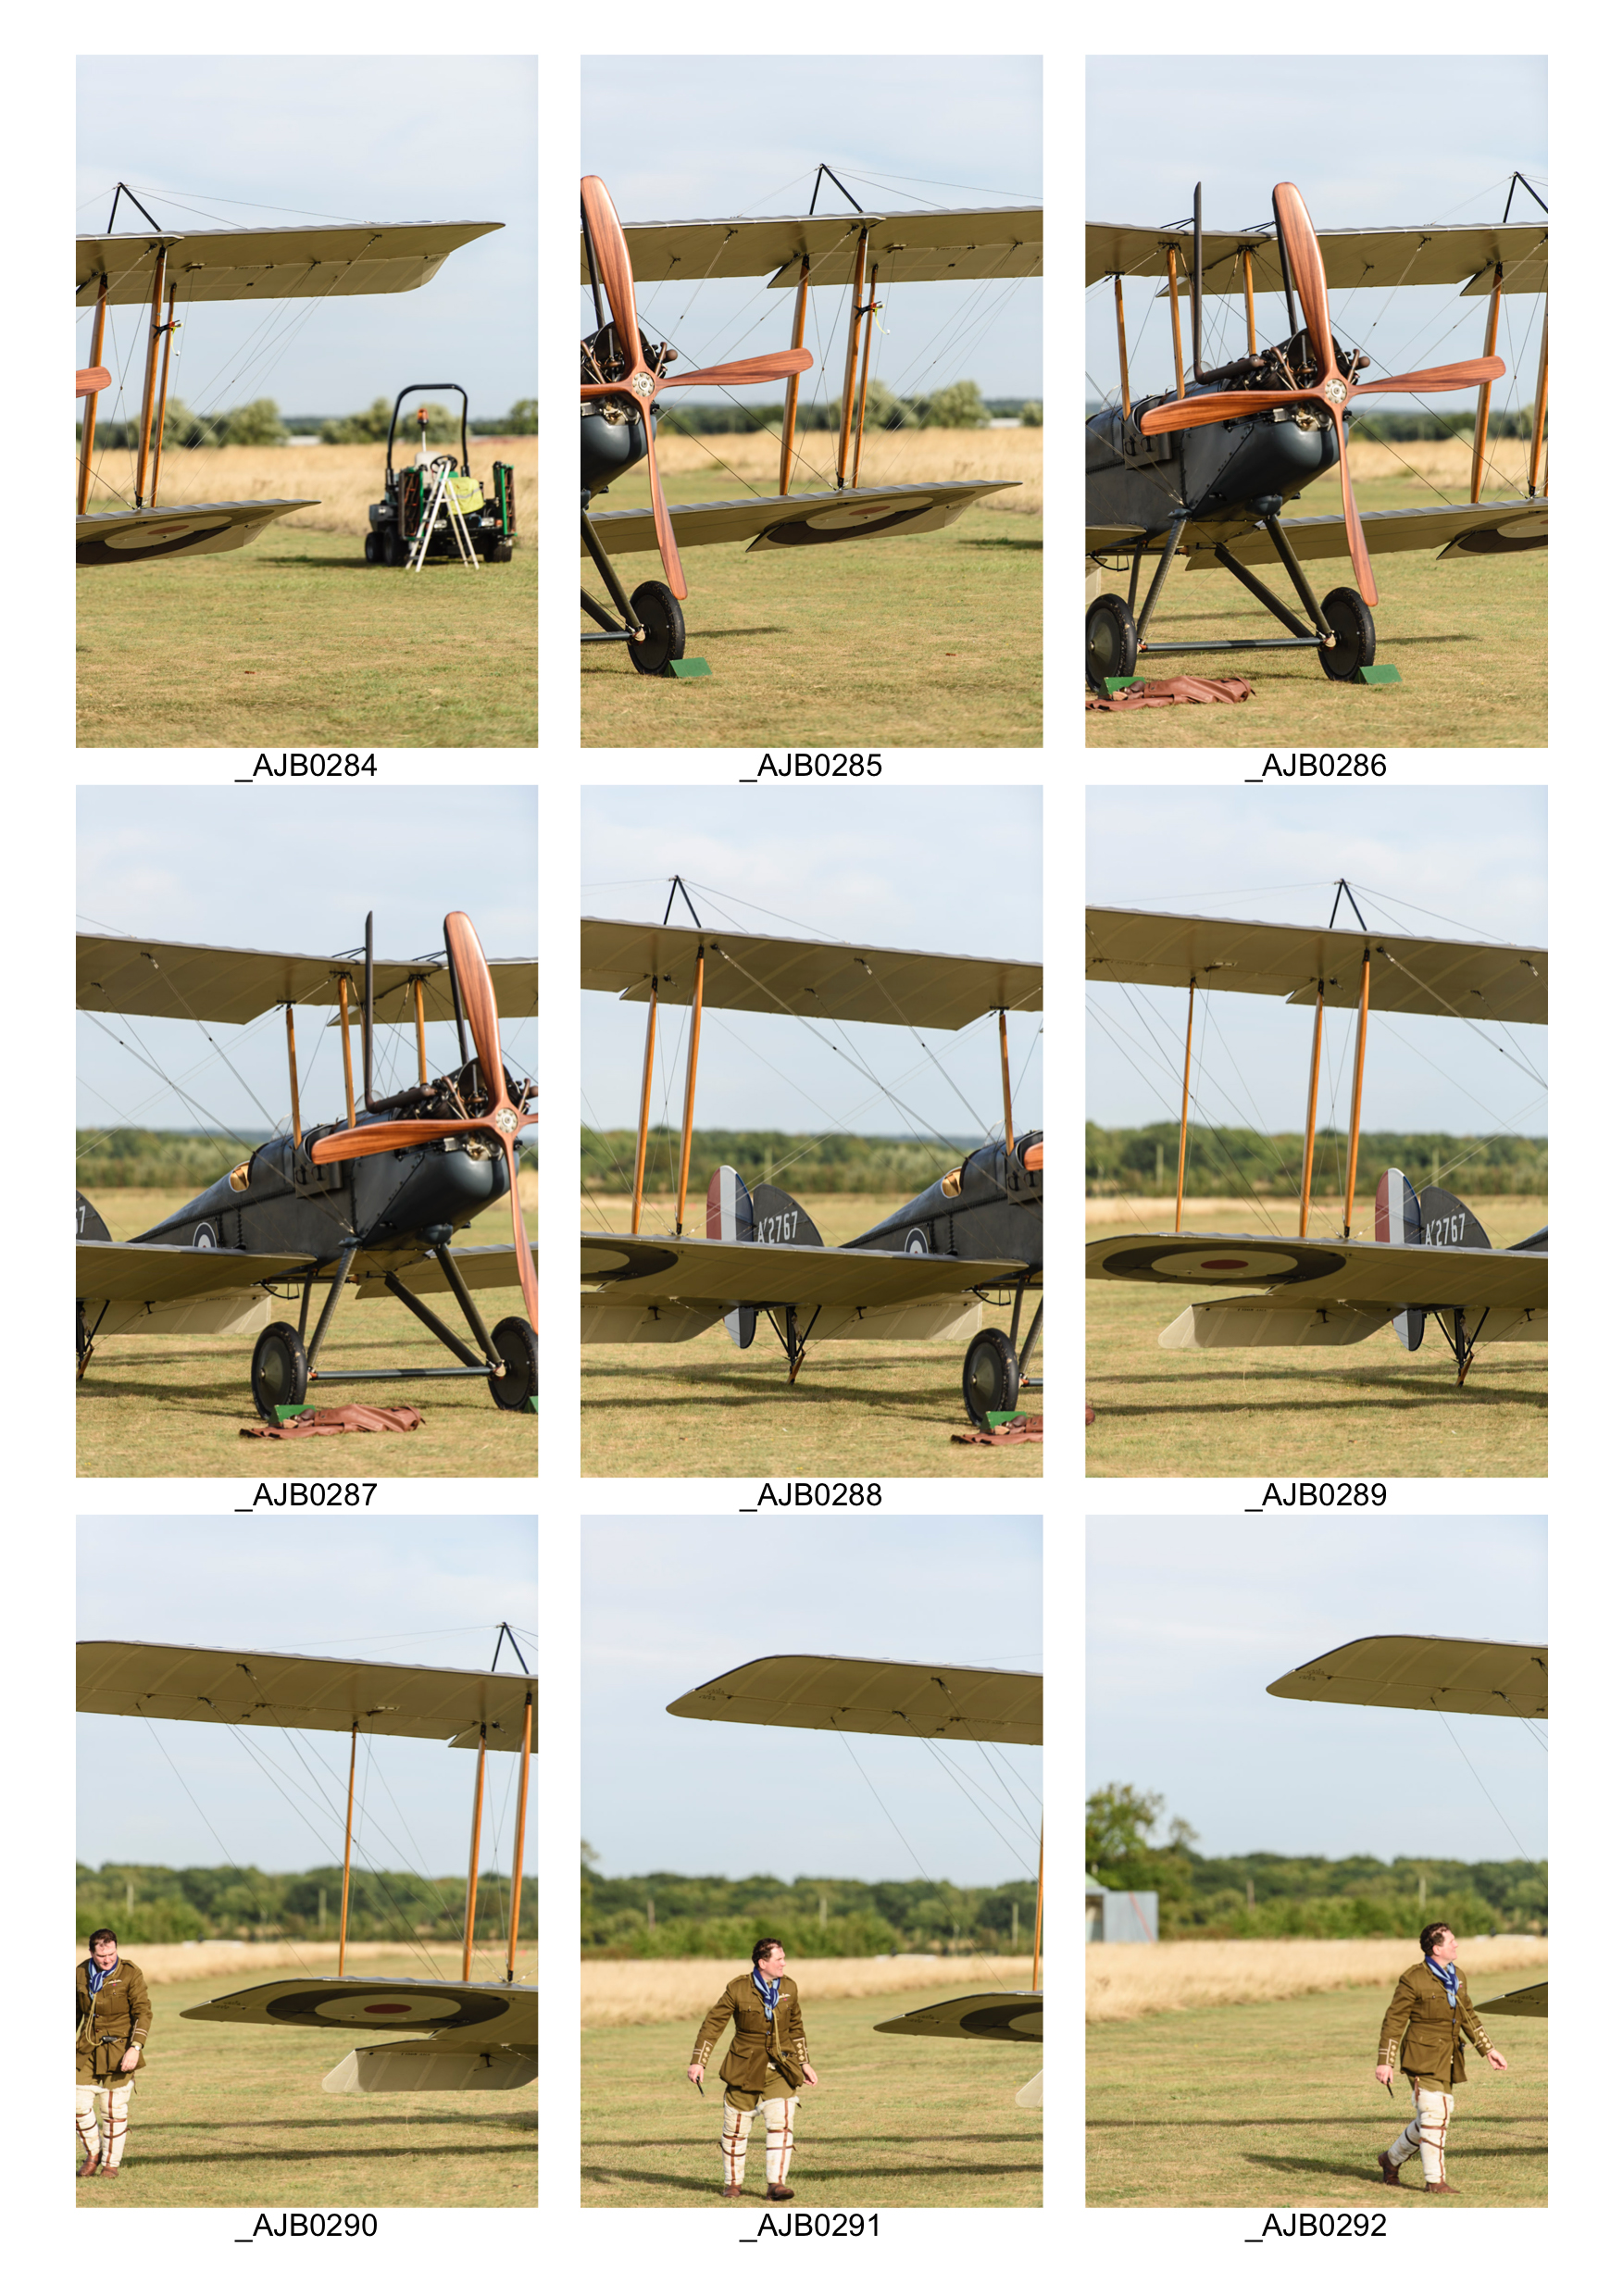
Fig. 2. 9 original frames
So, I took 9 overlapping frames, portrait format. Manual exposure and white balance: Nikon D810, 1/400 sec. f/2.8, ISO 32 (Low-1) , 200mm on a 70-200mm f/2.8 lens, hand held. I’ve put these in a contact sheet – see Fig. 2. Manual settings for exposure are really important for panos: brightness can easily vary across a subject, and manual settings for exposure and white balance keep everything consistent. Portrait format (i.e. with the camera tilted by 90° to give a vertical frame) lets you zoom in more (and get a small depth of field), while keeping some space top and bottom.
To create the pano, I exported full-size tiffs from Lightroom after doing just very minimal adjustments (black point and colour profile). These went into my long-standing and favourite stitching programme PTGui. I’ve blogged elsewhere about PTGui: I’ve had a copy, and kept it updated, for about 10 years now.
http://wonkyhorizons.blogspot.co.uk/2011/04/stitch-in-time-pleasure-of-panoramas.html
While Photoshop and Lightroom do a great job on straightforward panos, there is one area where PTGui still beats them hands down. That is when you have a pano with subjects moving through it. As you can see in Fig. 2, the “pilot” was busily moving around the aircraft, and I caught him in three different positions. I wanted to be able to choose the best of the available poses.
PTGui can produce a layered PSD/PSB file where each layer contains one of the original images. Using a layer mask hides or reveals each image. What this means is that in Photoshop, the layers with their masks can be used to reveal or hide anything that moves between frames. So the pilot appears in frames 290, 291 and 292 in Fig. 2. 290 is a non-starter as he’s cut off on one side, plus he’s just looking down. I chose 291 as the image to make part of the final scene. So, simply using layer masks with the layered file, I revealed the man in 291, and hid the others (see Fig. 3, layer labelled Image 7). Simples. (You’ll also notice an anachronistic tractor in frame 284 – it and its shadow had to disappear too. That was more prosaic cloning on the final image).

Fig. 3. Layers in the PTGui pano opened in PS. Layer 7 contains the pilot figure, and is reveal by the white layer masks. All the other individual layers are hidden with black layer masks, so the blended panorama comes through as the base image.
The final stitch is stupidly big: I saved the original layered file as a 3GB .PSB file. Seems a shame to output it at web size, but hey ho.
To finish, here is another one to make one further point. This is a famous Spitfire photographed at IWM Duxford: FR MkXVIII SM845 (G-BUOS), built in 1945.
http://www.arc-duxford.co.uk/hfl/restorations/sm845.html
I used the same approach with this one, with a couple of wrinkles. D810, 1/500, f/6.3, ISO 64, 220mm on an 80-400. Because the sky was very bright, I added a Lee 0.9 hard grad to tame it. The limited depth of field also came into play too: because the plane was quite close to me, the closest parts (the tail fin and rudder) were in a different plane of focus than the propeller. So as well as panning across the width of the plane, I refocused along its depth too.
When it came to getting the final pano, I first tried in Lightroom. I quickly ran into problems that were beyond my skill set. First, Lightroom doesn’t give you a choice about which bits of the composite come from which original: it insisted on using an image of the rudder that was out of focus. Second, I couldn’t quite get the projection right: none of the options looked exactly correct. Probably the skill of the operator, but too hard.
So, over to PTGui. The projection came out just right straight off, and it was easy to choose an image of the rudder in focus. Job done. So this is effectively a focus-stacked bokeh pano.
If I do one like this again, I’ll try being braver with the aperture. I chose f/6.3 to give myself some leeway with the depth of field because that close to the plane at 220mm there isn’t that much. But I think that being careful to pan across multiple focus layers should give a very good result even with a much thinner depth of field.
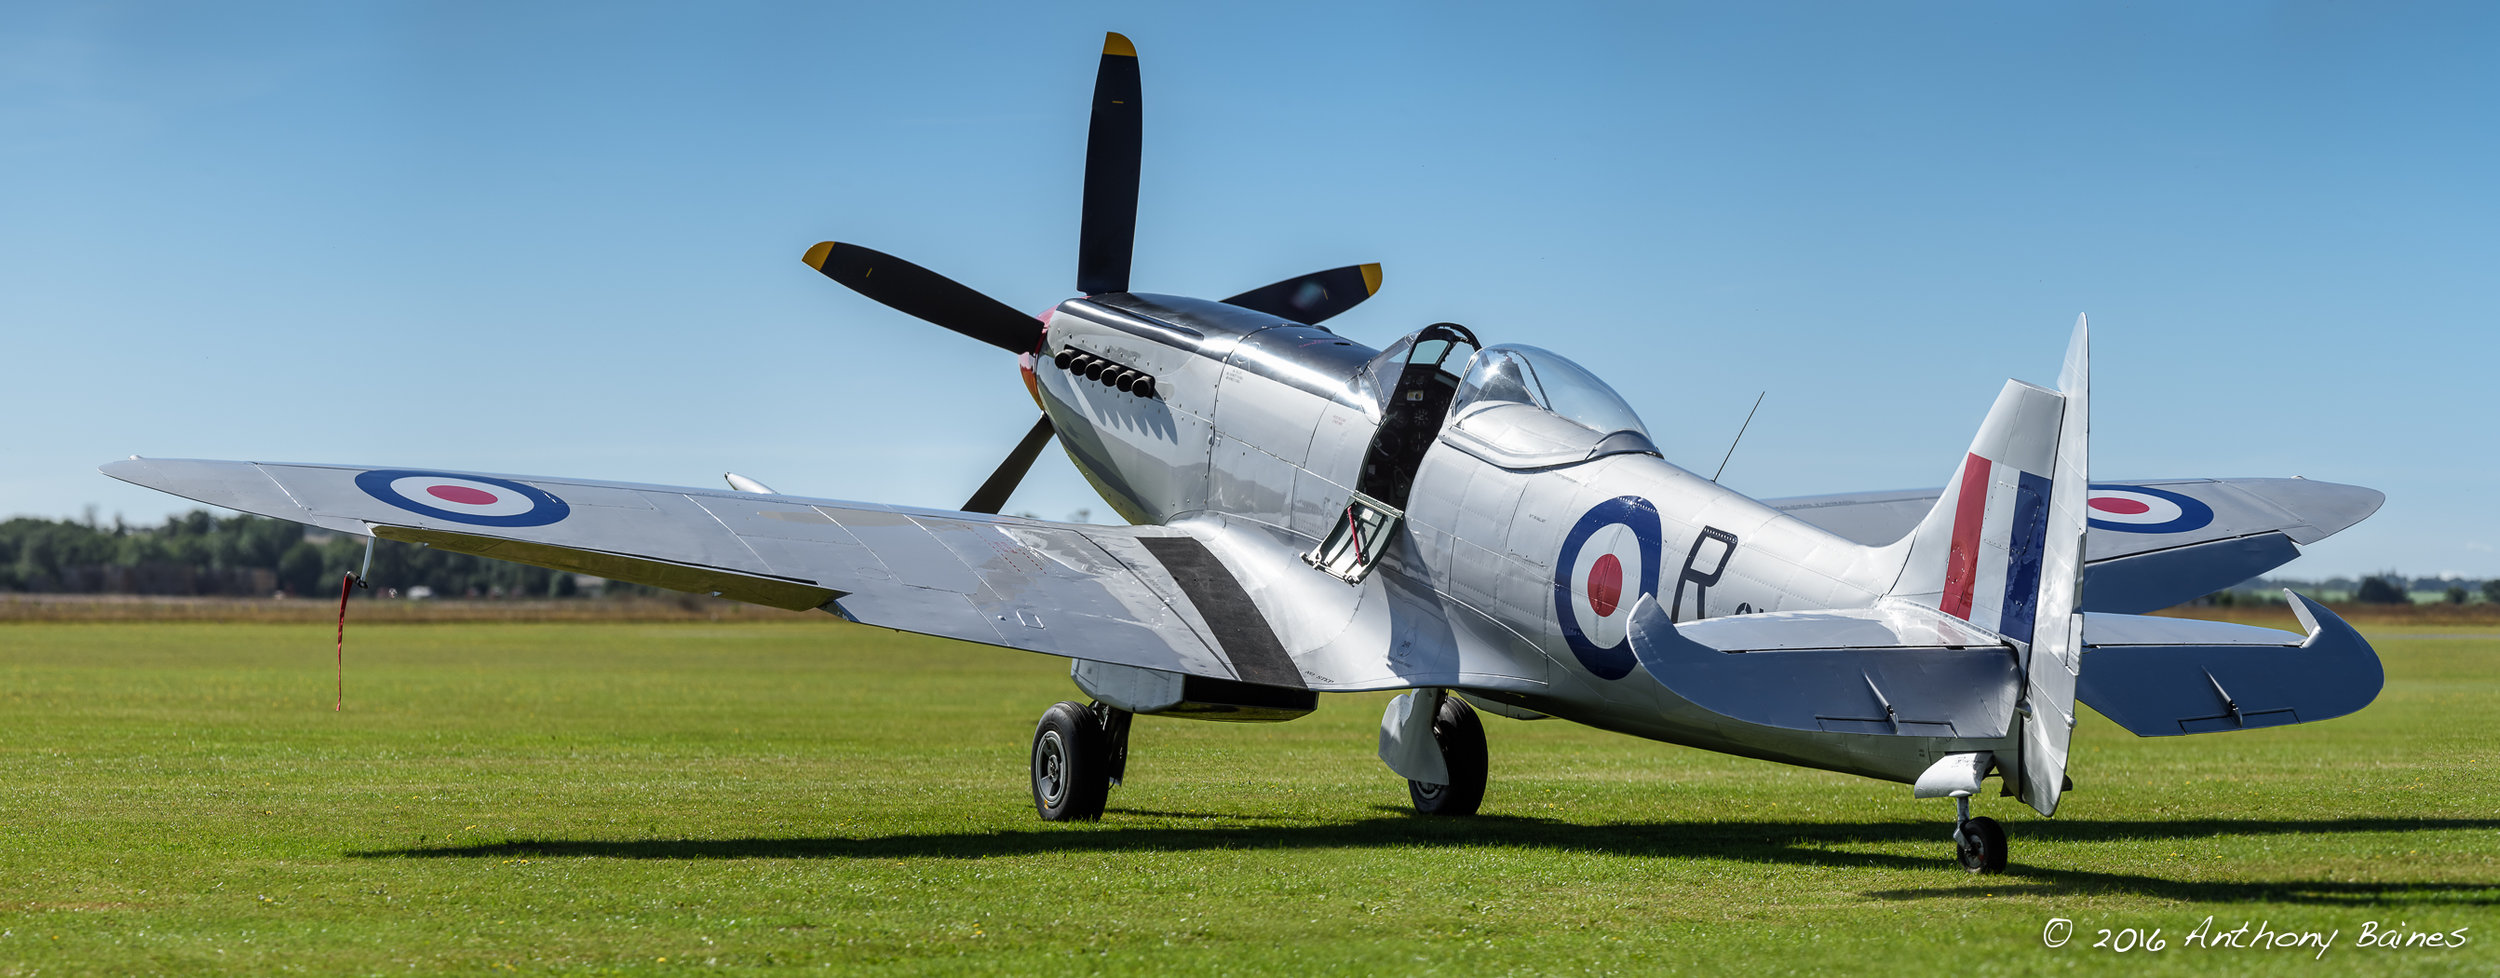
Fig 4. SM845